

5. BASIC OPERATION
5.1Basic Key Operation
Operation panel
Learn basic key operations here before you read each measurement procedure.Location of operation keys on the panel and Location of operation keys on
the wireless keyboard: “4.1 Parts of the Instrument”
•Wireless keyboard (SF14) (Optional accessory) makes key operation easier and speedier.
Specification of the keyboard: “27.2 Optional Accessories”
●Power ON / OFF {ON}: Power On
{ON} (while pressing) + { 

 }: Power Off
●Lighting up the display
{ 

 }: Switch the screen backlight On / Off
● Softkey operation
Softkeys are displayed on the bottom line of the screen. {F1} to {F4}: Select the function matching the sofkeys
{FUNC}: Toggle between MEAS Mode screen pages (when more than 4 softkeys are allocated)
● Inputting letters / figures
{F1} to {F4}: Input a letter or a figure allocated to the softkey
{FUNC}: Go to the next softkey page (search for the letter or figure you want to input)
{FUNC} (hold for a moment): Go back one softkey page {FUNC} (continue to hold): Go to previous pages
{BS}: Delete a character on the left {ESC}: Cancel the input data
{SFT}: Switch between upper and lower case {  }: Select / accept input word / value
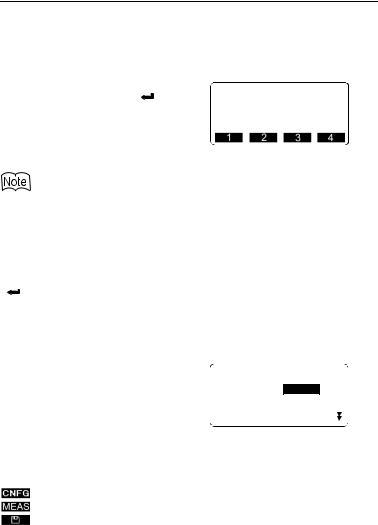
Example: Input of angle 125° 30′ 00″(Input “125.3000”)
1.Press  in page 2 of Meas Mode.
2.Press {  } to select “H angle.”
3.Press [1]. "1" is input and the cursor moves to next input position.
11
5. BASIC OPERATION
4.Press [2].
5.Press {FUNC} to display the page in which [5] is allocated.
6.Press [5].
7.Press {FUNC} to display the page in which [.] is allocated.
8. Input the remaining figures. When
input is complete, press { |
} to |
|
accept the value. |
HAR: |
|
125. |
||
When inputting, alphabetic character, press {FUNC} until the page in which letters are allocated is displayed, and input using the same procedure used for inputting figures.
● Selecting options
{ } / {
} / {  } : Up and down cursor
{ } / {
} / {  } : Right and left cursor / Select other option
{ |
} |
: Accept the option |
Example: Select a reflector type
1.Press  in page 2 of Meas Mode.
2.Move to “Reflector” using {  } / {
} / {  }.
}.
3.Display the option you want to
select using {  } / {
} / {  }. Switches between “Sheet” and
“Prism.”
EDM
Mode :Fine"r"
Reflector:Prism
PC :-30
4.Press {  } or {
  } to move to the next option.
5.The selection is set and you can set the next item.
● |
Switching modes |
|
|
|
: From Status mode to Config Mode (Configuration Mode) |
|
|
: From Status mode to Meas Mode (Measure Mode) |
|
|
: From Status mode to Memory Mode |
{ESC} |
: Return to the Status mode from each Mode |
|
|
4.2 Mode Diagram |
|
● |
Other operation |
|
{ESC} |
: Return to the previous screen |
|
12
5. BASIC OPERATION
Key operation for Wireless Keyboard (SF14)
The SET is operated from the Wireless Keyboard by pointing the Wireless Keyboard beam at the Beam Detector on the SET and pressing the required operation keys.
Remote operation
Remote operation
• When sunlight shines directly into the Beam Detector on the
Caution
SET, the Wireless Keyboard may not work correctly.
•If other SETs are turned ON and placed within the operating range of the Wireless Keyboard, they may be unintentionally operated at the same time.
•Do not place the keyboard under heavy objects or in a tight space. A key may be continuously depressed and deplete battery power.
•Ni-Cd batteries are recommended when operating the Wireless Keyboard under low temperatures.
•In temperatures around -20°C, the SET may function erratically if the Wireless Keyboard is operated too close to the SET. Hold the Wireless Keyboard further away from the SET and at various angles to the Beam Detector until normal operation is resumed.
●Measuring distance
{MEAS}: Start distance measurement (same as pressing  or
or  on the screen / same as pressing
  in missing line measurement) / Stop distance measurement
● Inputting letters / figures
{A/N}: Switch between numerals and alphabetic characters
13
5. BASIC OPERATION
{A} to {Z}: During numeric input, input numeral or symbol (+/- and .) printed above the key
During alphabetic input, input the character of the key
{E}: Enter letters and figures editing mode (same as pressing  on the screen)
{BS}: Delete a character on the left {ESC}: Cancel the input data
{SFT}: Switch between upper and lower case {  }: Select / accept input word / value
● Selecting options
{R} / {U} (  /
/  is printed above the key)
:Up and down cursor (numeric input mode) {V} / {T} (  /
/  is printed above the key)
:Right and left cursor / Select other option (numeric input mode)
{ |
} |
: Accept the option |
Other operations (softkey operations and switching modes) are the same for the operation panel on the SET.
Power On/Off and lighting up the display cannot be done on the Wireless Keyboard.
5.2 |
Display Functions |
|
|
|
|
|||||||
|
|
|
|
|
|
|
|
|
|
|
|
|
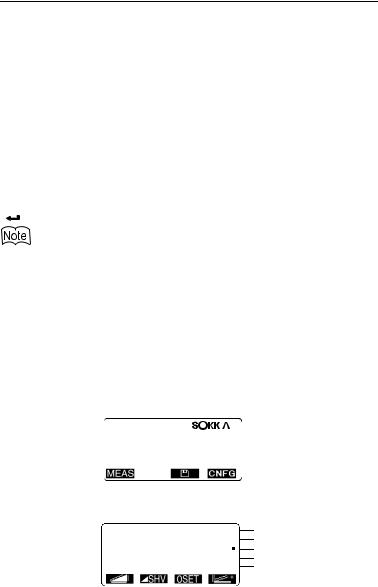
● Status screen |
|
|
|
|
||||||||
|
Instrument name |
|
|
|
|
|||||||
|
--- |
|
|
|
|
|
|
|
|
|
|
|
|
|
|
|
|
|
|
|
|
|
|
||
|
|
SET510 |
|
|
|
|
|
|
|
|
||
|
|
|
|
|
|
|
|
|
||||
|
|
|
|
|
|
|
|
|
||||
|
|
No. XXXXXX |
|
|
|
|
|
|
|
Application Software |
||
|
|
|
|
|
|
|
|
|||||
|
|
Ver.XXX-XX-XX |
|
|
|
|||||||
|
|
|
XXX-XX-XX |
|
|
|
Version |
|||||
|
|
Job.JOB1 |
|
|
|
Job |
||||||
|
|
|
|
|
||||||||
|
|
|
|
|
|
|
|
|
|
|
|
|
● Meas Mode screen
|
|
Meas |
PC |
-30 |
||
Distance *1 |
|
S |
ppm |
0 |
||
|
|
|
|
|
||
|
|
|
|
|
||
Vertical angle *2 |
|
ZA |
|
|
|
|
|
|
HAR |
|
|
|
|
Horizontal angle *3 |
|
|
P1 |
|
||
|
|
|
|
|||
|
|
|
|
|||
|
|
|
|
|
|
|
Prism Constant value Atmosferic correction factor Remaining battery power *4 Tilt angle compensation *5 Page number
14

5. BASIC OPERATION
* 1 Distance
Switching distance display status: “24.1 Changing Instrument Options z Settings in Config Mode”
S : Slope distance
H : Horizontal distance
V : Height difference
* 2 Vertical angle
Switching vertical angle display status: “24.1 Changing Instrument Options z Settings in Config Mode”
ZA: Zenith angle (Z=0)
VA: Vertical angle (H=0 / H=±90)
To switch vertical angle/slope in %, press 
* 3 Horizontal angle
Press  to switch the display status. HAR: Horizontal angle right
HAL: Horizontal angle left
* 4 Remaining battery power (BDC46, Temperature=25°C, EDM on)
: level 3 Full power.
: level 2 Plenty of power remains.
: level 1 Half or less power remains.
: level 0 Little power remains. Charge the battery.
 (This symbol is displayed every 3 seconds): No power remains. Stop the measurement and charge the battery.
* 5 Tilt angle compensation
When this symbol is displayed, the vertical and horizontal angles are automatically compensated for small tilt errors using 2-axis tilt sensor.
Tilt compensation setting: “24.1 Changing Instrument Options z Settings in Config Mode”
15